selbekk

Smart Optimization Techniques: Lazy Loading with React
Want your React app to go from pretty fast to blazing fast? Then let me introduce you to the art of lazy loading your code!
If you’ve ever worked on a medium-to-big web application, you’ve more than likely noticed that the bundle size (the amount of JavaScript code shipped to the browser) is an ever-growing monster. With every added library or admin-only feature, your app starts loading just a little bit slower for regular users. And while it still might feel performant on your laptop, people with last year’s phone model in a place with bad reception are going to feel that performance degradation quickly.
As it turns out though, the main issue isn’t really the amount of code you download in total, it’s the amount you have to download (and parse, and run) before you show anything of interest to the user. That delay can be really long for some users, and that will definitely translate to lost dollars for your business. In other words - it’s a challenge worth investing in.
This article aims to give you a great introduction to lazy loading as a concept, how it’s done in React, what approaches to use and when you’ll get the best results possible.
What is lazy loading?
Lazy loading refers to the technique where you’re fetching code when you need it, and only then. You split your big JavaScript bundle into a bunch of distinct parts, a technique called code splitting, which can contain the code for a page, a section, or even a single component. When that code is required, you ask the server for that particular code, download it and load it into memory - just like it would have been there the entire time.
Splitting up your app into several chunks comes with its own set of challenges. Deciding what to put into each bundle, when to download it and what to do while you wait for the code to download are all challenges we need to solve.
The basics of lazy loading in React
Since this kind of code splitting is so important, React ships with built in support for handling Let’s kick off with a small example:
import * as React from 'react';
import { Router, Route } from 'react-router-dom';
import LandingPage from './pages/landing-page';
const AdminPage = React.lazy(() => import('./pages/admin-page'));
export const App = () => {
  return (
    <React.Suspense fallback={<Spinner />}>
      <Router>
        <Route path="/" component={LandingPage} />
        <Route path="/admin" component={AdminPage} />
      </Router>
    </React.Suspense>
  );
}
We’re creating an app with two routes - / and /admin. By default, we’re bundling the landing page with the main bundle of the app (and loading it as usual). With the admin page, however, we’re doing something different.
The line React.lazy(() => import('./pages/admin-page')) might come across as new syntax to many - but it has been built into JavaScript for a few years now already. Let’s take a quick glance at what’s happening, and what it means for the user experience.
The import('./some/file') syntax is called dynamic imports, and they work by requesting a particular part of a bundle. They often work as markers in bundling tools like Webpack or Parcel, and make these tools output more JavaScript files with less code in each.
The React.lazy() function basically tells React to “suspend” its rendering while we’re waiting for this particular part of the application to load from the server and being parsed. This concept of suspending is pretty new and novel, but all you need to know now is that the <React.Suspense /> component we wrapped our app in will show a fallback UI whenever we’re waiting for code to download.
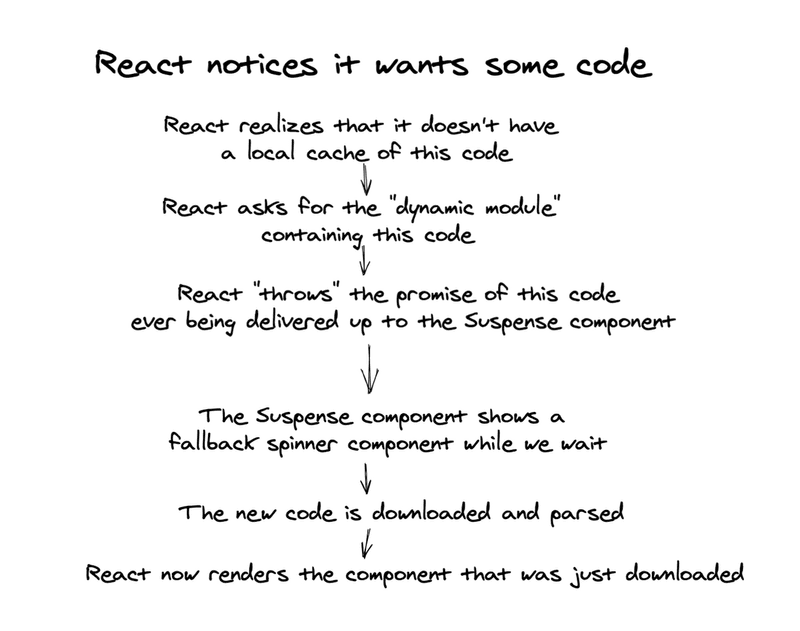
In other words - the flow goes like this:

Explore a demo
This might sound reasonable, but let’s look at a demo to see it in practice.
In the CodeSandbox, we’re lazily loading a component that uses some pretty large libraries. Since we’re only using those libraries in the component in question, we can defer loading them until we want to show them on the screen.
When we’re rendering the “expensive” component, we wrap it in a <React.Suspense /> boundary. This means that we can show a fallback UI (like a spinner, a skeleton UI or just a text string) while we wait for the component’s code to download.
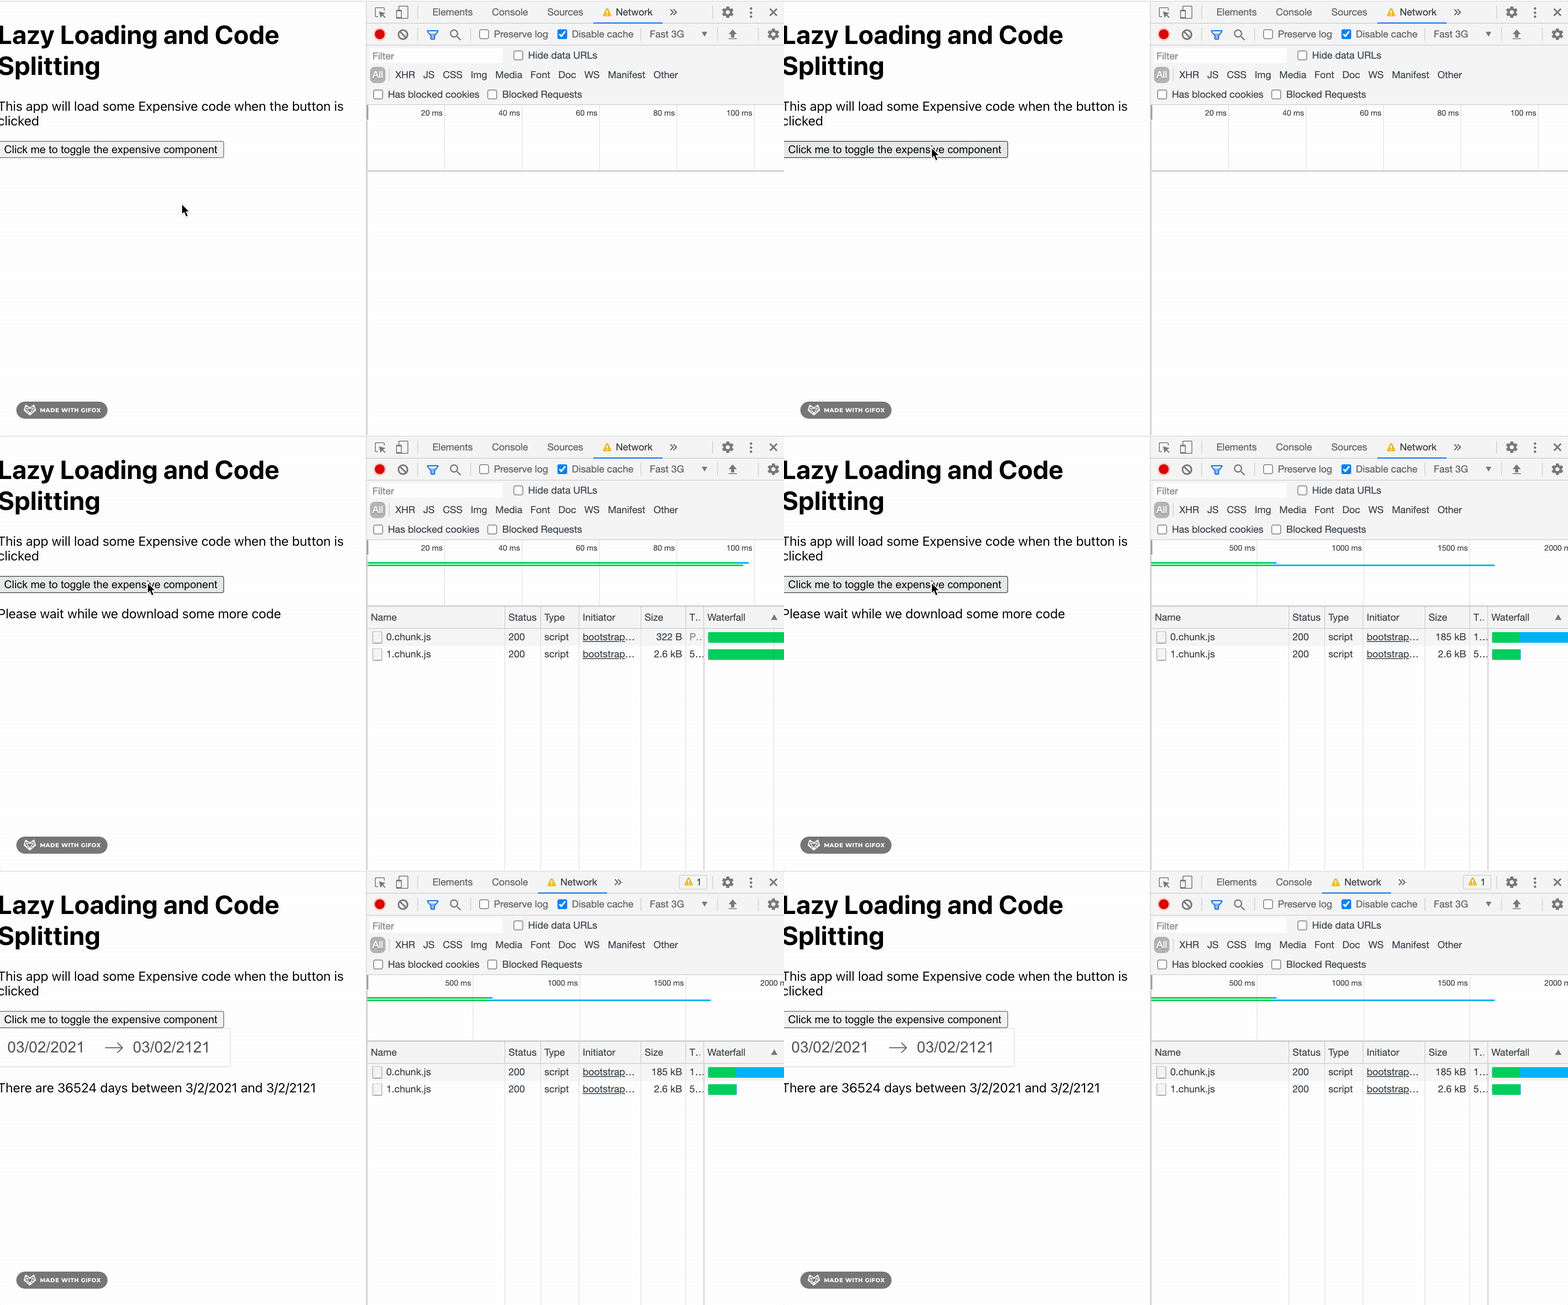
Here’s how this process looks in Chrome Dev Tools:

Naming bundles
The bundles we load work fine as is, but they’re not really aptly named. 0.chunk.js and 1.chunk.js might get the job done, but it’s not great for debugging errors in production.
Luckily, there’s a way we can improve the chunk naming. Webpack supports a special commenting syntax called “magic comments”, which lets you name the different chunks.
First, let’s go into our App.tsx file, where we specify the dynamic import. We need to change this:
const SomeExpensiveComponent = React.lazy(
  () => import("./SomeExpensiveComponent")
);
to this:
const SomeExpensiveComponent = React.lazy(
  () =>
    import(
      /* webpackChunkName: "SomeExpensiveComponent" */ "./SomeExpensiveComponent"
    )
);
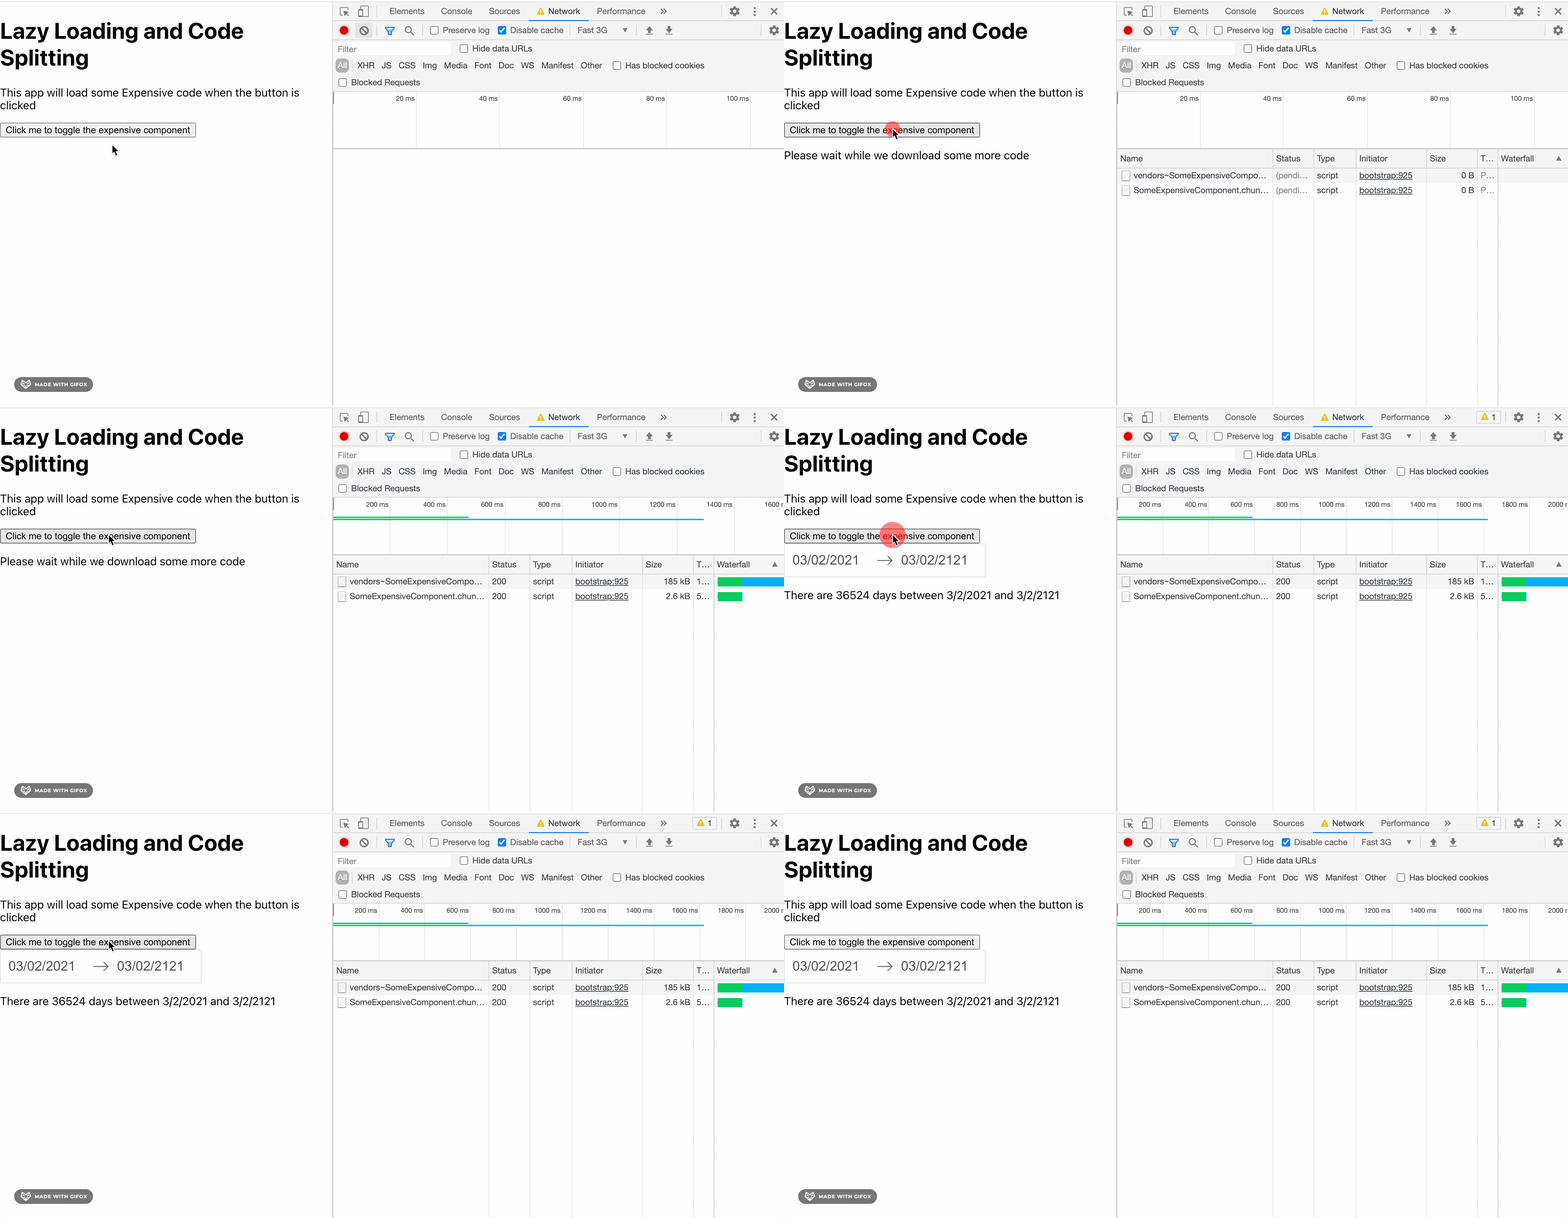
Now, we can reload our page, and notice the chunk names have changed!

Code splitting strategies
Code splitting and lazy loading code is great for only loading the parts of the application your user is using right now. But where do you set the threshold for what should be bundled together, and what should be lazily loaded?
There are two main approaches out there, and they both have their advantages and disadvantages.
Route based splitting A lot of developers start out by splitting their app based on routes, so that each route (or screen in your application) comes with its own bundle. This is a great approach for scenarios where you have a bunch of routes but the user rarely visits them all. And the concept makes sense too - why download code for pages the user has yet to visit?
The downside of splitting apps based on routes is that you lose the instantaneous feel of navigating a single page application. Instead of navigating right away, we need to download the new page in the background before it’s shown to the user. This can be mitigated by a variety of techniques (preloading a page whenever a user hovers a link, for example), but is hard to do correctly.
Component based splitting Some developers decide on splitting out most major components into their own bundles. This solves most of the challenges with a route based approach, as the routes themselves are bundled together.
However, there are drawbacks to this approach too. Each time we lazily load a component, we have to provide a fallback UI while it loads in the background. Also, each chunk comes with a little bit of overhead and network latency, which can accumulate to an even slower experience than doing nothing at all.
All the things based splitting My experience is that I get the best result from combining the two approaches, and considering what gives the best bang for the buck in any given situation.
A great example is the idea of splitting your app into a “logged in app” and a “logged out app” (courtesy of Kent C. Dodds’ article on authentication in React). Here, you do a high level split between two parts of the application that will rarely overlap.
Another example is code-splitting out rarely used routes like the contact page or privacy policy. In those cases, showing a spinner for a second might be completely acceptable, since it’s not a part of the main user experience.
A third example is when you have to load a particularly large component in certain situations - like a date picker library for when the user has to input their birthday in the sign-up flow. Since most users won’t require it - let’s just show a fallback UI while we lazily load the extra code for those that do.
Consider each case, and measure the difference it provides in bytes. Many build systems (like create-react-app for instance) provides you a diff from your last build, in both bundle size and individual chunk sizes. Don’t be afraid to try - but make sure the difference in performance is worth the trade-offs of higher complexity.
Be lazy
Adding some lazy-loading can be a great thing for most modern web applications. You ship less code to the end user, and only when they need it. It’s easy enough to get started, and as long as you consider what strategy to use for a particular use case, it’s easy to scale it to your entire app as well.
All rights reserved © 2025